In NSW a carport is deemed an Exempt Development by the Department of Planning and Environment. The linked to document from the Department states:
Carports as exempt development
You can build a carport without planning or building approval, as long as it complies with specific development standards in the policy. Carports cannot be built as exempt development when on a lot that contains a heritage item (or draft item), or in a foreshore area.
The maximum size allowed
The floor area of a carport must not exceed:
- 20 m² on lots with an area of 300 m² or less
- 50 m² for lots larger than 300 m² in rural zones and residential Zone R5
- 25 m² for lots larger than 300 m² in other zones.
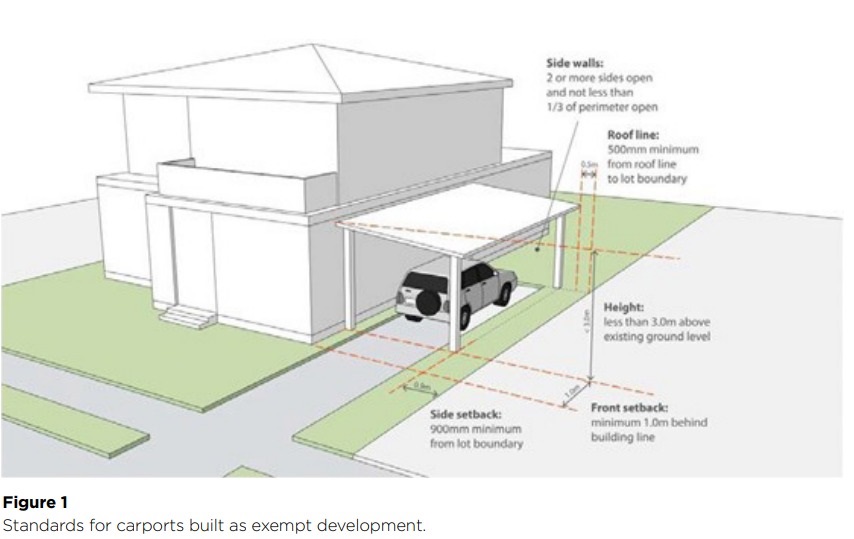
- The carport must not be higher than 3 m above ground level (existing), and if it is attached to a single storey dwelling, not higher than the roof gutter line of that dwelling.
- At least 2 sides and one-third of the carport’s total perimeter must be open.
Where you can build them on your lot
Carports must be at least 1 m behind the building line facing any road (the building line is the face of the wall and does not include any porch or portico type structure).
The carport must be setback:
- at least 5 m from any lot boundary in zones RU1, RU2, RU3, RU4, RU6, R5
- at least 900 mm in any other zone.
- In heritage conservation areas (or draft conservation areas), carports must be located in the rear yard.
- The roof of the carport may project into the required setback area, but it must be setback at least 500 mm from any lot boundary.
Figure 1 below illustrates the requirements.
If you need to construct a new driveway or gutter crossing, you must get approval from the relevant road authority first (under the Roads Act 1993). The road authority is generally your local council, but in the case of classified roads, you should contact Roads and Maritime Services.
Other standards that apply
- On bushfire-prone land, carports must be constructed of non-combustible materials if it is within 5 m of a dwelling.
- Roof water from the carport must be disposed of into an existing stormwater drainage system.
- Any connection to a building fascia must be done in accordance with a professional engineer’s specifications.
- Works must not reduce vehicular access to or from the site or reduce existing car parking, or loading/unloading facilities.
- Any metal materials must be low reflective, factory pre-coloured materials
One carport per dwelling
For residential exempt development, you can only have one carport for every dwelling house on the lot. For instance, if the lot has one dwelling house, there can only be one carport on that lot. If there is a primary and secondary dwelling on the lot, you can have 2 carports.
Residential carports and garages as complying development
Carports and garages can be built as complying development as attached and detached development.
To be complying development, the new carport or garage must not result in all of the development on the lot exceeding the gross floor area.
In residential zones
Carports and garages can only be built as complying development on lots zoned residential R1, R2, R3, R4 and rural zone RU5, that:
- have an area of at least 200 m²
- a width of at least 6 m.
The carport or garage must comply with the following development standards (cl 3.16 of the policy):
- Garages can only be built on lots that are less than 8 m wide when the vehicle access is from a secondary road, parallel road or lane (not the primary road).
The maximum permitted height for detached garages or carports is 4.5 m above ground level (existing).
- If vehicle access is on a primary road frontage, the carport or garage must be set back at least 5.5 m or 1 m behind the building line, dependent on front setback from the boundary with the primary road.
- The total width of all garage door openings that face a road must not exceed:
- 3.2 m on lots that are between 8 m and 12 m wide, or
- 6 m on lots that are more than 12 m wide.
- The location of carports and garages on battle-axe lots must allow vehicles to exit the site in a forward direction
DIY Carport
It is important to bear in mind that although carports are an exempt development they will still be required to meet basic health, safety, structural, environmental and heritage requirements in line with the local government (Council) and Building Code of Australia.
It's also important that you locate where water and electricity services are to avoid any damage to them or yourself during construction.
You need to select hard wearing exterior timbers, such a treated pine, and stainless steel fastenings.
If you're not confident you can build this carport from that shown here bear in mind you can now buy carport kits which make it relatively simple to not only comply with the above but also put the kit together.
However, if you want something a little more suited to the Pittwater environment, this basic carport from timber posts and roof sheeting may appeal more.
Tools
- Builders square
- Carpenters' Pencil
- Cordless drill
- Dust Mask
- Earmuffs
- Hammer
- Ladder
- Nail gun
- Power Saw
- Safety goggles
- Saw
- Shovel
- Set square
- Spirit level
- String Line
- Tape Measure
Materials
- Posts
- Beams
- Battens
- Rafters
- Post Stirrups/Supports
- Bolts, fasteners and screws
- Cement
- Roof sheets - we used polycarbonate roof sheeting
- Hoop iron
Measure
The first element you need to do is measure the dimensions for the carport, the length, width and height.
You need to take two measurements off your wall or where you plan to place the carport to make sure the string line runs parallel; the width and the length. After marking the first measurement, use the hammer to drive in a piece of timber that you can tie a string line around. Measure the same distance out from your wall and hammer in a nail. Run the string line beyond the required length of the carport.
Hammer two hurdles (bits of wood) into the ground. Use a nail gun to secure a piece of timber to the hurdles. Pull the string line tight so that it touches the nail you hammered in for your string line. Mark that spot on the piece of timber and hammer in a nail. Tie the string line off around the nail.
Mark-off the height of the carport: Use two pieces of wood as a base and a piece of timber to measure the correct height for the carport. Mark this off with a pencil against the hard side. Use the nail gun to secure a piece to mark the correct height.
Always check your measurements: Measure the distance between the string lines at each end to make sure that they're square.
Setting up your posts
preservative treated. Refer to ‘Construction Timbers in Queensland’ for suitability www.daff.qld.gov.au.
Preservative treatment for posts in the ground and framing on the ground, shall be to hazard level H5. Preservative treatment for framing more than 150 mm above ground should be H3.
- adequate ventilation
- surface drainage
- correct timber species selection
- access for future maintenance and termite control.
- constructed from naturally termite-resistant timbers, in accordance with Appendix C in AS 39660.1, or
- constructed from preservative-treated timber in accordance to Appendix D of AS 3660.1; or
- have a termite barrier to protect the primary building elements installed in accordance with AS 3660.1.
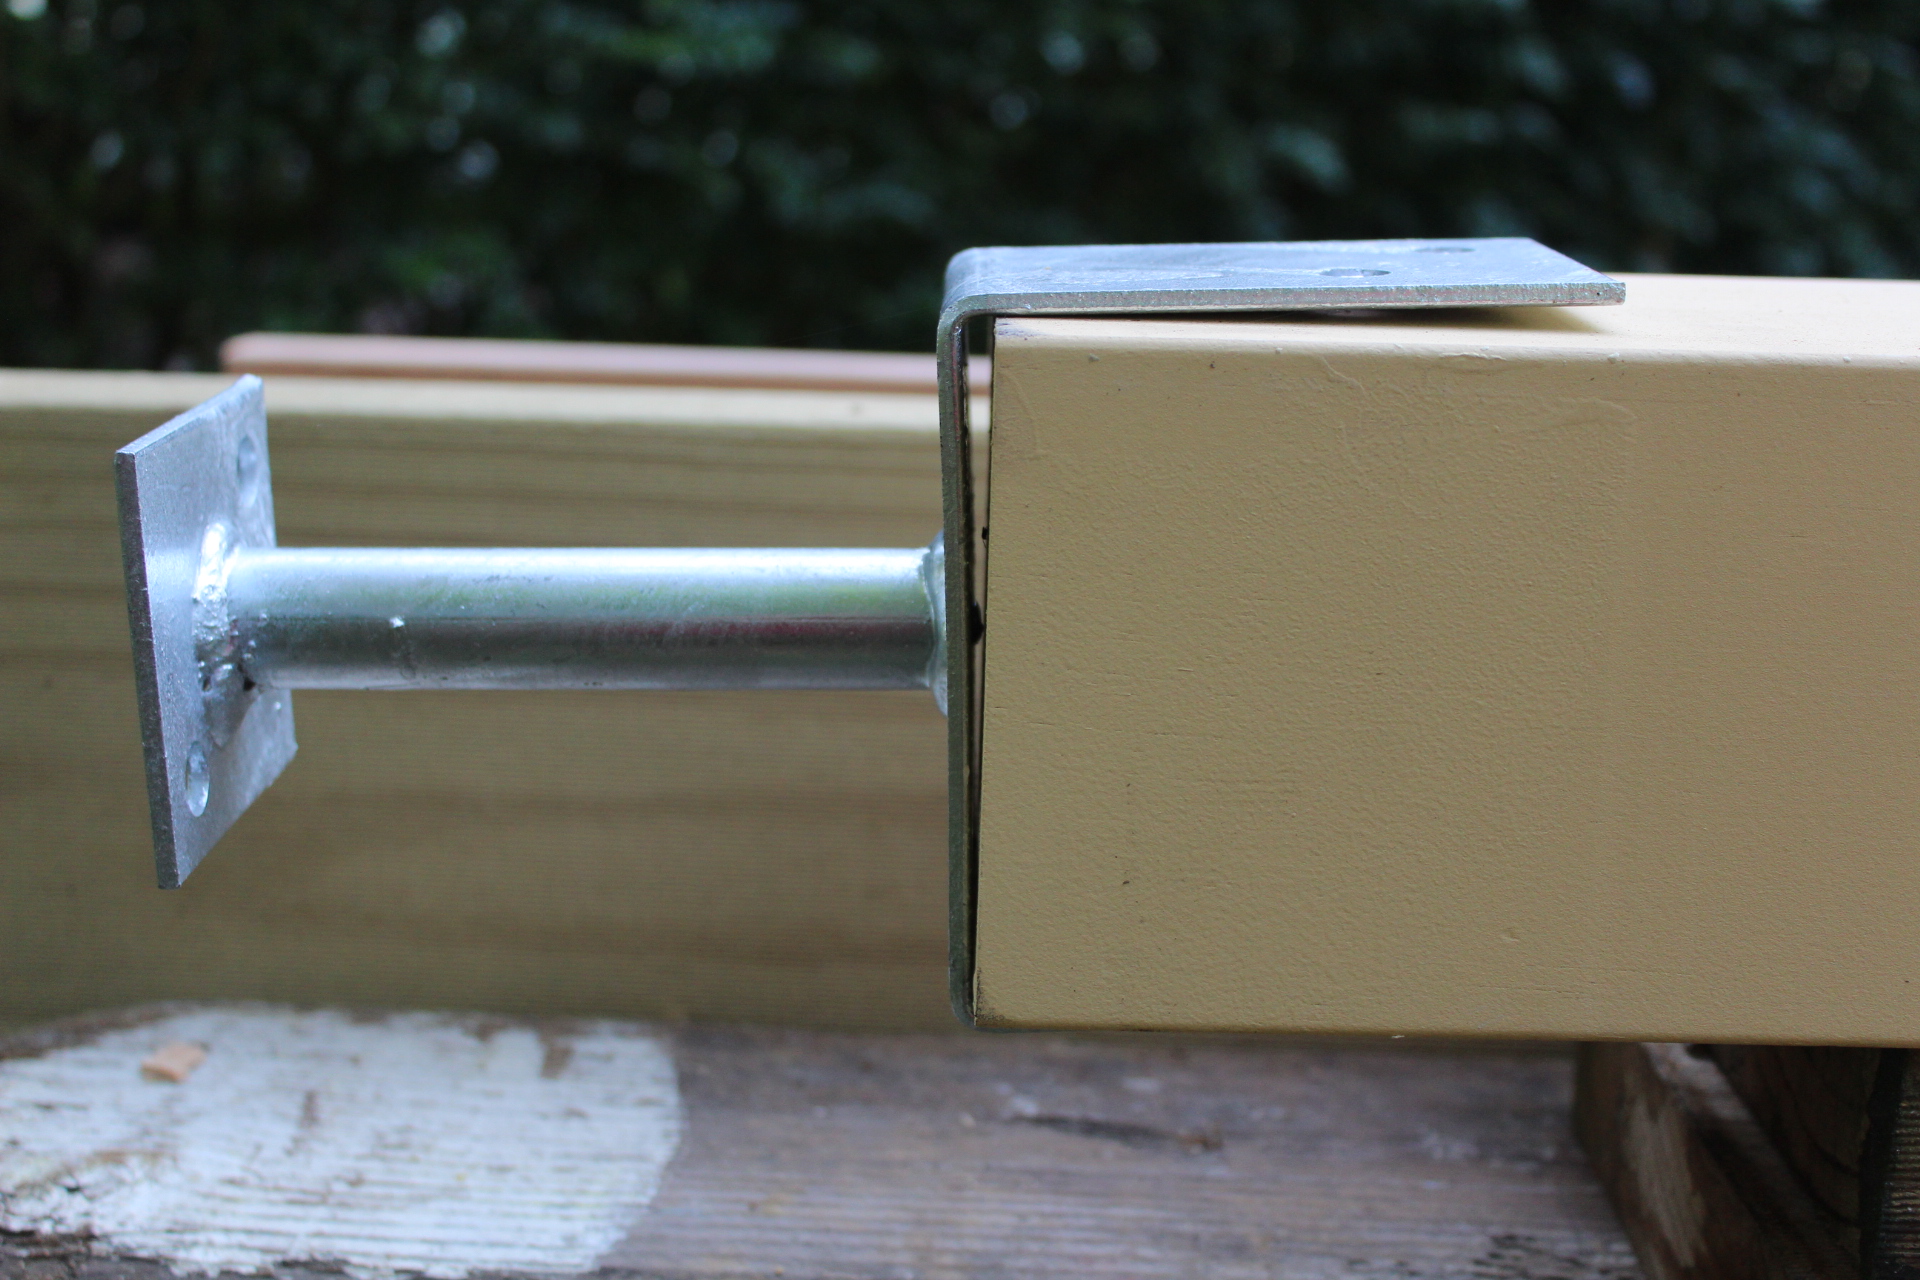
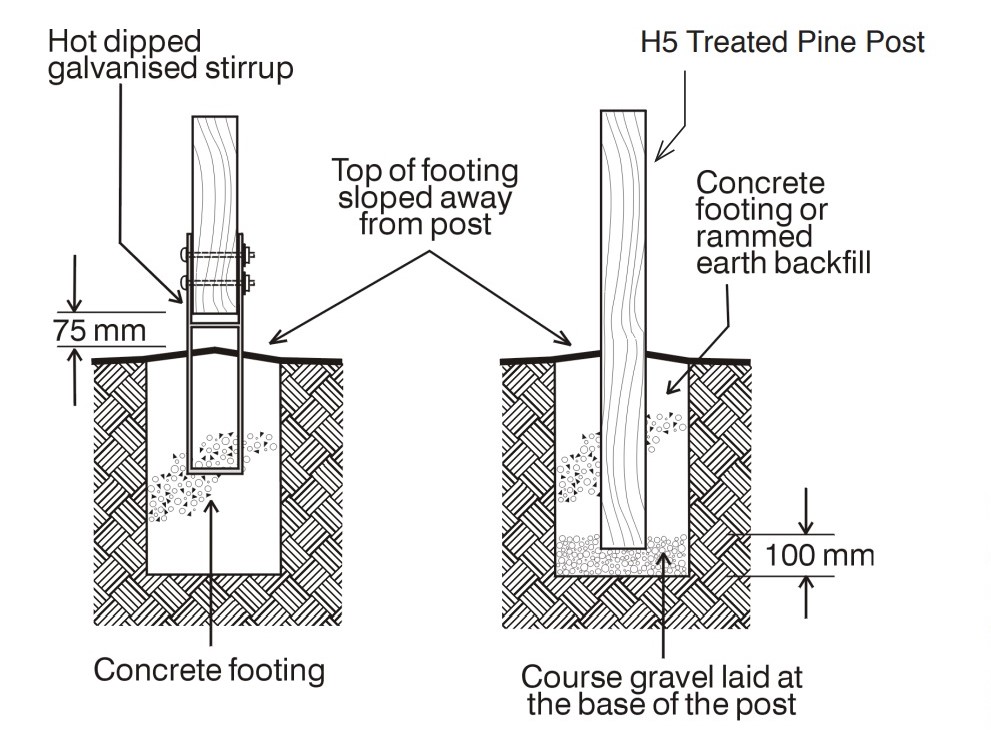
Termite protection can be achieved by placing all posts that support the deck framing on galvanised metal stirrups that have at least 75 mm clearance above the finished ground level:
fasteners are not suitable due to early breakdown of the plating.
Footings for supporting posts are usually designed in two ways. The most common method is concrete footings with galvanised stirrups embedded or fixed in the footings to support the posts. An alternative method is to support the deck post by embedding the post directly into the concrete footing. When this method is used, care is required to use no-fines concrete, have adequate concrete under the post and slope the top of concrete footing away from the post.
The design of footings is outlined in AS 2870 or AS 1684. Usually, the soil classification and expected loads on the deck are required to be known. Decks designed to AS 2870 and AS 1684 are for decks used for housing with average loads and ground conditions. If these conditions are not met (e.g. the deck needs to support a spa or the deck is to be tiled), the design needs to be considered by a structural engineer.
Posts
As shown above, posts are usually connected to concrete footings via a stirrup. They are generally preservative-treated softwood (H3 hazard level) or natural above-ground durability Class 1 or 2 timber species.
The span tables within AS 1684 have the required timber sizes for posts (that table is available here). These are dependent on the area, post height and stress grade of the timber selected. Common cross-sectional sizes for posts vary, but usually start at 88 mm and upwards. Minimum sizes for posts are also governed by the distance between the ground and the underside of the bearers.
.JPG?timestamp=1722066103598)
.JPG?timestamp=1722066486630)
.JPG?timestamp=1722066216791)
Installing Framework - Beams
To install side post for your carport, measure out your beam height and mark it out squarely on the end of the post. Then down the side of the post, measure out how thick the beam will be so that it sits in squarely on the post.
Cut along the marked lines with your circular saw and you will create the cut out in the post that will support a beam. Knock out the cut off with a hammer, and then chisel off any rough edges. For your corner posts, mark up and cut another side on the post.
You'll need a friend to help you put the posts into the supports that you've already made. Use a spirit level to make sure the posts are level or your carport won't be straight. Place the post in the middle of the support with the cut outs facing outwards.
When your post is level, screw in the post to the support. Brace your posts with timber and clamps so it doesn't move while you're finishing.
.JPG?timestamp=1722066271095)
With the help of a friend, lift up your pre-cut beams and nail them into the cut outs at the top of your fixed posts, just to hold them in place. Make sure the beams have been cut on a 45° mitre to get a nice sharp corner when you join them together.
Once your beams are all in place, screw them together. Put the batten screws in at different heights so that they don't hit each other at the joins. Continue on nailing and screwing in your beams until you've finished your carport framework.
.JPG?timestamp=1722066360003)
Install the Rafters
Mark out the spacings for your rafters on the beams and how many rafters you'll be using. Remember that more rafters will give more strength to your structure. Make the marks on both beams that will connect your rafters so that everything lines up. Check those measurements again!
When you install your rafters, make sure that they are nice and flush against the perimeter beams when you nail them in. A good tip is to leave one side of the rafters lower than the other. This will mean that the flat ceiling will effectively drain off water. Pre-drill your holes before you screw batten screws in so they are all even and neat.
.JPG?timestamp=1722066441877)
After you've built your carport, you need to brace it. This will stop it from moving and also keep it square. This means measuring and installing bracing.
Stand on the ladder and with help from someone else, measure the distance from one corner of the carport to the one diagonally opposite it. Repeat this for the other corners. If the distances are the same, your carport is square. To keep it square, nail a long piece of timber from the top of the post at the front of the carport to the bottom of the post diagonally opposite it. This timber will act as a brace.
.JPG?timestamp=1722066664875)
.JPG?timestamp=1722066729362)
Cut the hoop iron to the distance you measured from one corner of the carport to the one diagonally opposite it. Standing on the ladder, nail in one end of the hoop iron in one corner of the carport, using the galvanised nails with the flat head. Roll-out the hoop rail diagonally across the carport, so that it sits above the rafters. Wearing your safety gloves, pull the hoop rail tight. Nail it into the post. Nail the hoop iron into each rafter, with two nails in each rafter.
Repeat the above step to attach the second hoop iron from one corner of the carport to the other. It's important to make sure the hoop iron is pulled tight before you nail in the second set of nails. After you've attached the two hoop irons, use the hammer to remove the piece of timber nailed to the front of the carport.
.JPG?timestamp=1722064726611)
Install Roof Battens and Roof Sheets
With the right tools, installing battens on a carport roof is a relatively easy D.I.Y. project that you can do yourself. First off, it's important to get the spacing of your battens correct. Measure the width of the carport using the front rafter and work out where you will place the battens. They need to be evenly spaced and the correct distance apart for the kind of roof you're attaching.
When installing a corrugated metal roof, battens (or purlins) should be spaced no further than 1.2m from one another for metal roofing sheets that are 0.7mm thick, and 1m for 0.5mm thick sheets. With a pencil, mark on the beam where each of the battens will be secured.
Polycarbonate corrugated sheets need a minimum of a 5 degree fall this ensures adequate water runoff. Purlin Spacing for Corrugated sheets is 800mm for end spans and midspans are 1000.
To begin; run a string line from the high side of the carport to the lower side. Do this by hammering in a nail on the second rafter on the high side of the carport and another on the opposite side. Attach a string line at the bottom of the two nails and make the line tight. This string line will tell you the height the battens need to be cut so that the carport has a fall for rain to run-off.
Transfer the markings from the front beam, where the battens will be attached, to the second beam, where the string line is. Measure the distance between the string line and the rafters, where the battens will be attached. These measurements are the height the battens need to be cut to.
Use the height measurements you have taken from each of the points along the string line and mark that distance on each of the battens you need to cut. Use the set square to mark a straight line along the length of each of the battens. Use a power saw to cut the battens along the line, so they're the correct height. Each batten should be lower than the other.
Stand on the ladder and have someone pass the batten up to you. Lay the batten on the top of the rafters, where it's going to be installed. Make sure it's flush to the opposite end where you're working. Use a pencil to mark off the batten, so it's the right length to fit snugly on top of the rafters. Use the power saw to cut it to the correct length.
Make sure that the batten is running straight from one end of the carport to the other. To make sure that it doesn't move, use the nail gun to secure the batten in place on a few rafters. Pre-drill a hole in the first rafter and secure the batten to it with the batten screws. Repeat this process so that the batten is secured to every second rafter. Repeat those steps for all of the battens you need to install.
With some projects you may not need the battens if you have installed enough rafters to make your structure strong. But always at least put two battens of timber along the length of your rafters so your roof sheeting sits above these. Next: Install your roof sheeting!
.JPG?timestamp=1722064640616)
.JPG?timestamp=1722066936817)
Polycarbonate Sheets Installation Guidelines
The simplest method to install the polycarbonate sheets is to use the specifically designed Aluminium or Polycarbonate profiles to join the sheets. When installing always check the frame structure: battens/purlins or rafters (or both)? This is important because you must determine the proper width of the sheets. To install 2 or more polycarbonate sheets on a roof you will need:
- Polycarbonate Sheets
- H Profiles, Aluminum or Polycarbonate depending on the thickness of the panel
- U profiles, Aluminum or Polycarbonate depending on your preferred choice
- Gaskets and Screws to fix the sheets to the support structure
- Solid Aluminum Tape to close the flutes on the top side of the sheets
- Vented Aluminum Tape to close the flutes on the bottom side of the sheets
In most cases this is all you need to install polycarbonate sheets on a roof:

Polycarbonate Sheets before installing them on the frame you must follow a few steps of preparation:
- Check for the UV protected side. This side must be installed on the top side of the roof facing skyward. Ours had UV coating on both sides, 50/50.
- Close the Top edge of the width side of the sheets with Solid Aluminium Tape to prevent water and dust from getting inside the ribs
- Close the Bottom edge of the width side of the sheets with Vented Aluminium Tape. This ensures condensation drainage, and blocks out dust and insects.
Instructions courtesy Just Polycarbonate
.JPG?timestamp=1722065375648)
.JPG?timestamp=1722067006302)
This build took just over a two days and cost almost $2,500.00 for the Materials, including the paint for the end beam and the stains for the framing beams and posts - all sourced from Johnson Brothers Mitre 10 at Mona Vale.
The Treated Timber and Roof Sheeting will be the most expensive items of this build.
If you have to employ people to do this you can triple that bill as Labor is the most expensive element of most building projects - especially those that require two sets of hands for different elements of the build.
It is also a project that can be completed over a cold Winter's weekend if you're organised, have the tools listed, and have a few mates who will help out for a few hours.
If you don't have the tools it may be worth investing in your own future DIY works by getting those that will help you build this project.
And there you have it - a DIY Car Umbrella - or Carport as the car aficionado prefers to call it.
.JPG?timestamp=1722064144313)
Tools + Products to help you get it done from Johnson brothers mitre 10
Makita Slide Compound Mitre Saw 260mm: $589.00

The LS1110F has several class-leading electronic features that ensure safe and efficient use. The LED job light casts a shadow of the saw blade onto the workpiece as an exact cutting line, by aligning the shadow with the line on the workpiece an exact cut can be made. When starting the LS1110F with the 2-finger trigger switch, the soft start module will ensure a smooth start before rapidly achieving full speed. When the user releases the trigger, the electric brake will quickly stop blade movement. The LS1110F has a sub-fence on the left-hand side that can be extended for more stable cutting of a wider workpiece. The handle at the top of the saw features a soft grip, and there is a carry handle to allow for easy transportation around the job site.
- The 260mm (10-1/4”) slide compound mitre saw (LS1110F) features a 1,450W motor capable of 4,500rpm no-load speed
- The LS1110F can mitre 47° to the left and right of the centre, with a cut capacity of 91x310mm at 0° and 91x220mm at 45°
- The bevel capacity of the LS1110F ranges from 47° to the left and 2° to the right
- The base of the LS1110F is diecast aluminium, meaning the construction of the saw is sturdy while remaining light
- The base has positive stops at popular mitre angles, allowing the user to lock in an angle quickly and accurately
Stanley FatMax 1650W Circular Saw: $89.00

Fully manipulate remarkable 1650W power with the Stanley FatMax Circular Saw, a tool of no compromise and ultra-performance. The 8-Tooth TCT blade supplies an improved cut quality, working alongside the dependable, durable 2-speed transmission. Demand consistent, top-grade results always with a piece of equipment designed for tough trade applications. Operators can make simple, fast bevel adjustments from a lever with 2 detents and a shoe that pivots up to 55°, just as effortless as the cut depth adjustment lever. Direct dust extraction keeps the workspace clear and the environment cleaner, a vital function for safe and efficient workshop and site practices.
- Powerful 1650W motor delivers true tradesman performance
- 8-Tooth TCT blade improves quality and cutting performance
- Up to 66mm cut depth for fast accurate rip, cross and bevel cuts
- Quick bevel adjustment lever with 2 detents, pivoting up to 55°
- Dust extraction is made easy with a direct vacuum hose connection
- Effortlessly adjust cutting depth by lever design
Stanley Tradecut 8TPI Saw 20"/500mm: $15.50

The Stanley 500mm TRADECUT Saw provides quick, efficient cutting with triple ground induction hardened teeth and a comfortable, slip-resistant bi-material grip. This Stanley 500mm Tradecut Saw features seven hardened and tempered teeth per inch, delivering fast cutting and a smooth finish.
- A blade thickness of 0.85mm reduces blade flex ’wobble’ for better control
- Induction-hardened teeth stay sharper for longer
- 45° and 90° angle guide for quick marking before cuts
- Optimised finger rest area for better comfort and control
- Bi-material plastic handle with a large rubber over mould for increased comfort and grip
- Blade and handle ultrasonically welded together for improved blade/handle strength
Makita 12V Max 2 Piece Combo Kit CLX239SA: $299.00

Kit includes:
- HP333DZ - 12V Max Hammer Driver Drill
- TD110DZ - 12V Max Impact Driver
- 2x BL1021 - 12V Max 2.0Ah Battery with fuel gauge
- DC10SB - 12V Max Rapid Charger
- Carry Bag
Stanley Beam Level 600mm: $22.85

The HPM Slimline Linear LED Batten Fixture in cool white. It has a top window for clear, easy visibility of the vial readings even from above. Integrated, rugged and oversized vials for excellent protection and durability. Three 12mm diameter vials are available for levelling at 180°,90°, 45° or other angles. Yellow powder-coated levels have been added to the levels for extra surface protection with hang hole for storage. Precision levelling performance with 2mm/m on all working edges, and a continuous edge on both sides to enable use as a ruler.
- Top window for clear and effortless vial reading even from above with hang hole for storage
- Integrated vials are encased in rugged, oversized plastic end caps, affording excellent protection and sustaining the vials’ accuracy
- Continuous edge on both sides
- Precise levelling performance with 2.0mm/m accuracy on all working edges
- Yellow powder coating has been added to the levels for extra surface protection
- Three 12mm diameter vials for levelling at varying angles (180°,90°, 45°)
Stanley FatMax Tape Measure 10m: $33.00

This Stanley 10m tape with Mylar Polyester coated blade extends blade life. The initial section of the blade also has a blade armour coating. It requires little force to take out and keep the tape aligned while taking measurements, ideal for the tradesman spending long hours on site.
- Patented airlock slide lock for easy locking
- 3-Rivet end hook
- Specially designed end hook with grabs on top and bottom for versatility
MaxiPro Safety Goggle & Visor Combo: $34.90

Ensure maximum protection with the MaxiPro Goggle & Visor Combo, an essential piece of safety gear designed for demanding environments. Whether working in industrial settings, laboratories, or outdoor activities, the MaxiPro Goggle & Visor Combo is your go-to for reliable protection and optimal visibility.
- Featuring a high-impact, anti-fog visor and comfortable, snug-fitting goggles, this combo provides comprehensive face and eye protection without compromising on comfort
- The adjustable headband allows for a secure fit, making it ideal for prolonged use
- Its lightweight and ergonomic design ensures ease of wear, while the anti-scratch coating on the visor guarantees clear vision even in tough conditions
3M High Performance Earmuff 29Db: $35.00

For noise demanding workplaces, the 3M High Performance Earmuff is built for Class 5 noise reduction of 29dB(A), providing excellent protection against harmful noise. Constructed with rugged components and an adjustable headband for an individual fit, this earmuff works in a wide array of environments including manufacturing and general construction.
- Class 5, 29dBA provides excellent noise reduction
- Suitable for general construction environments
- Rugged construction
- Adjustable headband for individual fit
- Certified to AS/NZS 1270:2002
Intergrain UltraDeck Timber Stain: From $18.90

Intergrain UltraDeck Timber Stain is a long lasting, semi-transparent, water based stain with outstanding durability that transforms the colour of exterior timber. This fast-drying, low odour finish protects timber from the destructive effects of weathering and aging. It is perfect for changing the colour of treated pine or reviving faded timber. On doors and window trims, UltraDeck Timber Stain can be over coated with Intergrain UltraClear Exterior for a gloss, satin or matt finish. UltraDeck Timber Stain is suitable for use on all exterior timber including decking, cladding, doors, window frames, screening, fences, garage doors, walkways and weatherboard.
- Long lasting, water based stain
- Transforms timber colour
- Revives weathered and faded timber
- Dirt and dust repellent
- UV protected and weather resistant

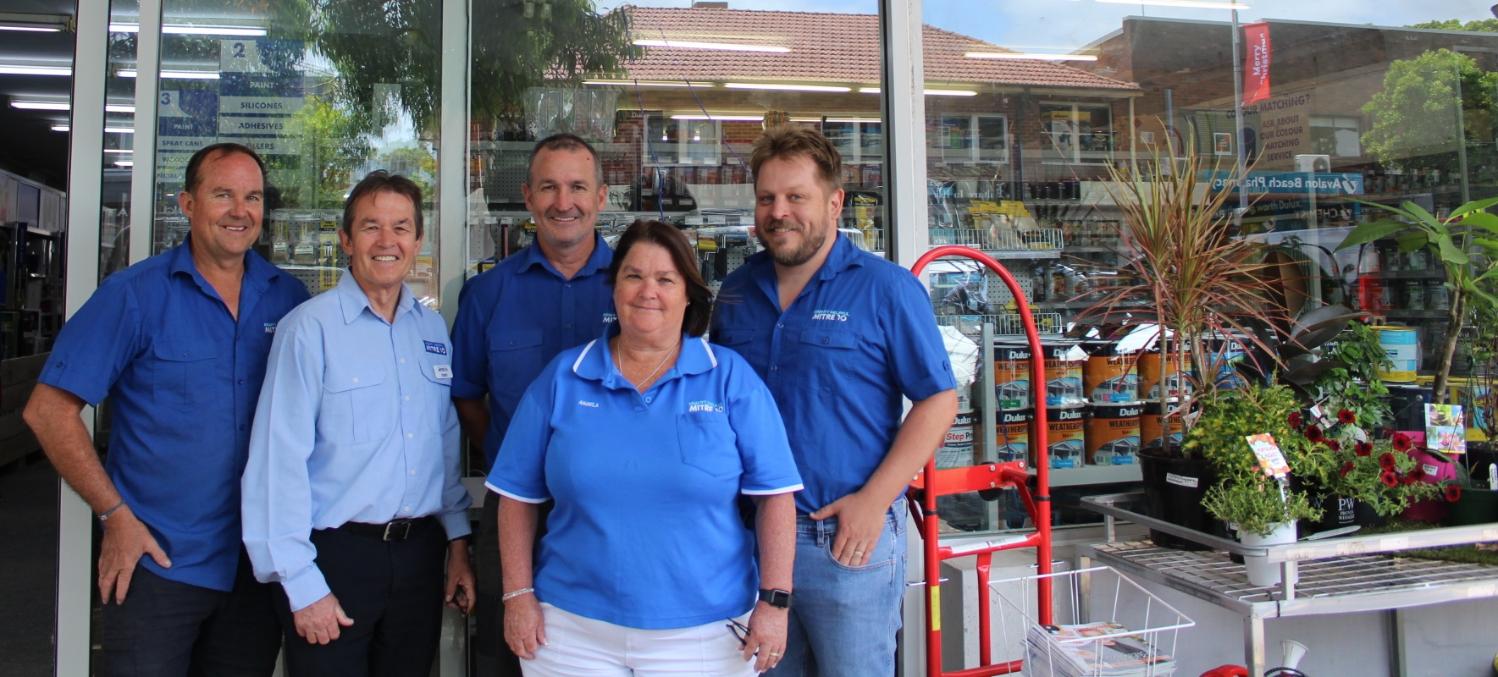
Johnson Brothers Mitre 10: Serving Our Community Since 1955
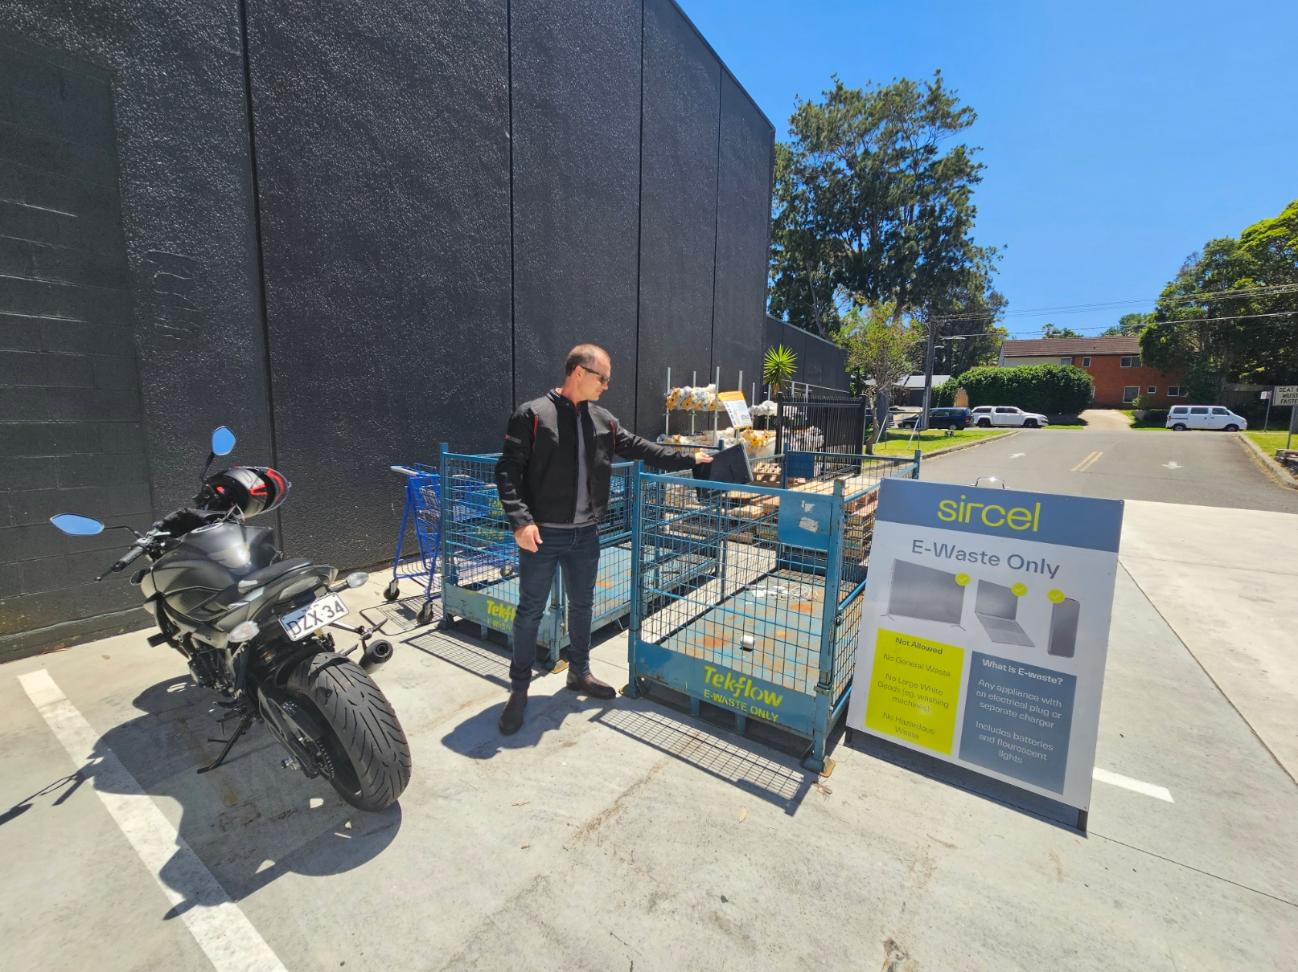
The Independent Hardware Group has awarded Johnson Bros Mona Vale the best in state Store of the Year at the IHG state awards again in 2023.
Johnson Brothers say; ''Thank you to all of our amazing staff and customers for being awesome!''
IHG is Australia’s largest home improvement wholesaler supplying more than 1,500 stores nationwide. These stores cater to a broad range of Trade and DIY customers and range from large format warehouses to convenience operations and Trade centres, as well as frame and truss sites in two States.
Under the IHG network, there is a clear mandate to support the growth of Independents within the hardware sector in Australia by helping them to be ‘The Best Store in Town’.
The culture of IHG is built on being a low cost and transparent business partner to members, with an unwavering commitment to protect and grow a sustainable independent hardware sector for the long term.


JBH Design Centre
JBH Design Centre is a tool for builders and DIY'ers to assist in the fit out of houses. It has displays of kitchens, Bathrooms, Doors and Storage as well as knowledgeable staff to assist in making house fit out painless.
Visit: http://jbhdc.com.au/
On Facebook: https://www.facebook.com/design.centre.jbh/


Click on logo to visit Johnson Brothers Mitre 10 website
Johnson Bros Mitre 10 - Avalon (02) 9918 3315
Johnson Bros Mitre 10 - Mona Vale (02) 9999 3340
JBH Timber & Building Supplies (02) 9999 0333
JBH Fencing & Landscape Supplies (02) 9970 6333
www.johnsonbros.com.au Online store: jbhmv.com.au

Previous DIY Pages:
Decking Timbers Caring For Your Deck Decking Finishes Privacy Screens I Privacy Screens II Privacy Screening Hardwoods Autumn Paths and Lawns Insulation Batts Plasterboard Ventilation - Edmond's Ecofan Blackboards for Children and Home Spring Lawn Care Shade Sails & Watering Basic DIY Tools DIY Tools - Power Drills Recycle Your Trampoline into An Air Bed How to Build Your Own Backyard Cricket Pitch Christmas Lights Displays around House and Garden Summer Mildew - Refresh, Renew How to Fix Things That Drip and Bump in the Night Time To Plant Winter Vegetables in a Raised Garden Beds Layout Organsing Your Tool Shed Make Your Own Weathervane Installing A Garden Watering System Decking Oils How To Make Garden Compost How To Winter proof Your Lawn How to create Shabby Chic effect on Timber Furniture How to Build Your Own Raised Garden Bed Growing Your Own Winter Vegies Winter Heating Guide Prepare Your Yard For Winter Eradicating Noxious Weeds From Your Yard How to Fix Furniture Finishes Part I How to Repair Scratches, Dings, and Dents of Furniture Surfaces - Part II Winter Draughts Fix Classic Wooden Tool Carrier Spring Garden Checklist Part I Install Your Own Skylight Retaining Walls for Saving Soil and New Spring Garden Beds Summer Salad Garden Native Plant Garden for A Fairy Arbour Renewing Short Flight of Exterior Stairs Deck Maintenance DIY Summer Tasks You Can Do In Time to Get to the Beach Garden Ponds for Attracting Birdlife, Dragonflies and for the Soothing Sounds of Water Salt Air: Maintenance and Protection Creating an Outdoor Dining Arbour, Gazebo or Patio - Part I Creating an Outdor Dining Arbour, Gazebo or Patio Part II Autumn Garden Tasks Autumn DIY Jobs: Waterproof Your Home Checklist Dealing With Dampness Inside the Home Fixing Your Fence Repairing and Replacing Damaged Decking boards DIY Toy Box and Snow Globes: School Holidays Fun - Winter 2015 DIY Wooden Toy Cars and Perfect Painted Flowerpots: School Holiday Fun - Winter 2015 Shoring Up an Under House Earth Bank – Installing a Basic Retaining Wall DIY One Shelf Sideboard Early Spring 2015 Garden Care Salad Garden For Children Keeping Your Garden and Home Cool in Hot Weather Classic Beach Garden and Camping Chairs 3 Portable Versions Anyone Can Make DIY Outdoor Furniture Mark I: Park Benches for Your Garden Make Your Own Scooter or Skateboard: Summer 2016 Fun How to Install a Solid Core Door and Door Furniture Summer Garden Jobs: Pruning A Hedge How to Make A Swing Chair - With A Frame for Garden Setting Garden Jobs for March to Make A Beautiful and Healthy Spring Keeping Outdoor Nooks Warm During Cooler Months Children’s Step Stool with Storage Stop Winter Rain Lawn Loss and Soil Erosion on Slopes DIY Garden Shed: Part 1 of 4 - Base DIY Garden Shed: Part 2 - Framing Walls DIY Garden Shed: Part 2b - Gable Roof Framing Garden Shed Part 3: Roof Installation DIY Garden Shed: Weather- boards - Door And Window Installation And Paint Finish DIY Coffee Table With Chessboard Inlay Spring Gardening: Feeding Your Soil And Plants - What Works For Each Plant DIY Sandstone Flagging Parking Area - Platform DIY Pre-Summer Checklist For A Safe Home Summer Spruce Up: Interior Paint Tips and Three easy steps to rejuvenate your timber deck The Perfect BBQ Garden Setting DIY Water Wise Garden DIY Side Gates DIY Storm Preparation And Home Protection One To Two Day DIY Weekend Spruce Ups Vegepods For Autumn Planting + Easy To Make Lego Table Or Student Desk That Can Be Dismantled + Johnson Brothers Mitre 10 Online Store Johnson Brothers Mitre 10 Great New Mona Vale Store: Still In Bassett Street - number 73 Johnson Brothers Mitre 10 New Mona Vale Store: The Greenlife Garden Centre Go Outside And Play: Creating Garden Spaces To Connect Children With Nature DIY Plasterboard Repair DIY Dolls House Or Garage Or Boatshed DIY Child's Waggon - or use as a large planter mover DIY Bathroom Refresh: Zing For Spring Tips for Growing a Native Garden FireCrunch, Australian Developed Fire-proof, Sustainable, Durable and Reliable Building Board Now Available at Johnson Bros. at Mona Vale and Narrabeen School Holidays DIY Ideas for Children: Little Vegetables Garden, Swing, Windchimes Bushfire Season Preparation 2017: Home and Outdoor Areas Johnson Brothers Mitre 10 Trade Centre at Mona Vale + Issue No 1 of Mitre 10’s inSITE Magazine for Tradies and Handymen Preparing Al Fresco Areas for Christmas Get-Togethers and Summer Visitors Summer De-bug; Mosquitoes, flies, cockroaches and ants - how to keep the outdoors insects where they belong DIY Summer Projects: Install A Fountain Or Water Feature Late Summer and Early Autumn Projects: A Shed For All Storage Solutions + Garden Tasks + Keeping Our Waterways Clean Autumn Plantings for Winter Harvests 2018 Paintback Collection Event: Johnson Bros Mitre 10 Mona Vale Saturday, April 7 Reducing Ticks in Your Garden: Garden care, Plants that Repel, What to Wear Outdoors Attracting Insectivore Birds to Your Garden: DIY Natural Tick Control Mother's Day 2018: DIY Rose Garden Winter Mould & Mildew Inside Your home: How to Keep Air and Surfaces Healthier DIY Traditional Rocking Horse Johnson Brothers Trade Day 2018 DIY Mushrooms and Vege Kits: School Holidays Fun Winter 2018 for Curious Kids Woodworking Projects for Beginners: School Holidays Fun Winter 2018 - Simple Storage Box + Wood Tool Box Spring Garden Prep: Soil Care Spring into Spring + JBH August 2018 Trifecta DIY Backyard Doggie Paradise Garden Care for Heavy Rain Days + Non-Toxic Snail and Slug Debug Ideas Garden Design and Plant Management to Minimise Tick Attacks and Infestations - insights from an essay by Bill Conroy BSc. (Agr) (Syd) + a Tribute to Wilfred Lawrence Conroy CBE by Keith Jackson, PNG and others Make Your Own BBQ Kitchen Garden: Gifts That Grow Past That Giving Day Christmas Lights 2018: Light Up the Night How to Keep Your House Cool During a Heatwave Without Using an Air-Conditioner Mid-Summer Garden Care 2018 Winners Of National Hardware Store Of The Year - Johnson Bros Mitre 10 Mona Vale! + End Of Summer Garden To Do List DIY Fruits of Your Garden: Growing Figs Fruits Of Your Garden: Growing Passionfruit - Autumn Is Also The Time To Plant Strawberries For Spring How To Water Your Plants When Away On Holidays + Some April 2019 School Holidays Fun For Outdoors; A Skateboard Swing Or Indoors; Grow Or Make Pot Plant People Dealing With Autumn Dampness Inside The Home + Mums Day Gifts For 2019 Winter Heating Guide + Get Ready For Winter Specials Keeping Your Garden Dewful During Times Of Water Restrictions and Drought Installing Leaf Stopper Gutter Guard + Trade Day 2019 JBH Mitre 10 Trade Day Guests 2019 An Artfull Garden - for Winter School Holidays 2019 DIY Deck Refurbishment: Turning Wood Into Open Tiled Spaces - Groundworks Father's Day Wish List 2019 + How to Re-stain your Deck timbers and posts for Summer Installing Posts For Decks and Verandahs With Heavier Loads + Installing Membranes For Tiled Decks National Garden Week's 2019 Focus Is On Children(Oct 13-19): Spring School Holiday 2019 Garden Ideas (to get started on) Replacing Balustrades Handrails DIY Tiling Your Verandah: and Choosing Your Simple Or Complex Tile Pattern Reduce Bushfire Risk To Older Homes + Preparing Your Yard For Bushfires Time to Put Up those Christmas Lights and Deck your Gum Trees with rows of Jolly! NSW RFS Bushfire Survival Plan 2020 + Reduce Bushfire Risk To Homes + Johnson Brothers Mitre 10 Great Water Saving Ideas during Level 2 water restrictions + some 'Don't Sweat Summer' Specials The Inaugural Sydney Edible Garden Trail - Learn how to help your garden survive the heat, drought, and water restrictions DIY Flyscreens DIY Privacy Screen In 2 Hours Family Hardware Store Wins Best In Australia Autumn DIY Jobs: Exterior Jobs to Keep Everything Dry and Cosy Inside the Home Autumn Vegepod Garden: Plant Now to Stay Healthy: JBH Response to COVID-19 Restrictions - We're Adapting! Autumn Holidays Projects: Let's Go Fly A Kite + Some handy Painting Tips for Interiors and Sprucing up that Outside Deck - Easter Hours 2020 Pittwater's Noxious Weeds: A Great Time To Get Outdoors and Pull Them Out and Replace With Native Plants Blooming Lovely: Late Autumn Planting For Gardens Full Of Colour, Cheer + Great Food For The Table Dealing With Dampness Inside The Home - June 2020 DIY A Job For Life: Apprentice Carpenter + Commencement Tool List Winter School Holidays 2020: Easy To Do Garden Mosaic Pavers Little Hands Can Create + Home DIYer: Simple Concrete Slab DIY - A Job For Life: Landscape Gardener Apprenticeship DIY Fathers' Day ideas for 2020 + August Garden Jobs DIY Job for Life: Plumber's Apprenticeship Early Spring Garden Care Spring 2020 + Salad Garden For Children A Job For Life: Certificate III In Electrotechnology - From Apprentice To A Business Owner; Jay Turns Up The Voltage On His Career + Spring Garden Specials - seedlings time! Spring is here and wattles are out in bloom: a love letter to our iconic flowers Perfect Tomatoes, Capsicums and Spring Onions - Summer Salad Staples + what to plant now BBQ Season: some tips to keep your New or Old BBQ Clean Christmas Lights Time 2020: Deck Your Home With Rows Of Jolly! Johnson Brothers Avalon Store Renovations & Mona Vale Store: Everything You Need This Summer In Stock How To Keep Your Home Cool During A Heatwave Dealing With Dampness Inside The Home: The Wet Summer Of 2020/2021 +Nothing By Halves, Johnson Bros. Mitre 10, great new video By Community Requests Autumn/February 2021 re-run: Garden Design and Plant Management to Minimise Tick Attacks and Infestations The Bees Knees: what you can plant now to help your garden grow and help the bees Dealing with Storm Events: Flooding inside and around the home - how to Be Prepared Fun Project Ideas for Autumn School Holidays 10 Ways to keep your home warm and save money this Autumn and Winter Mother's Day 2021 Ideas: Grow Her Some Lemons Or Avocadoes Or Get A Pink Step Ladder So She Can Safely Reach The Top Shelf Indoors + JBH Celebrates Upgrade Of Avalon Beach Store These 3 Tips Will Help You Create A Thriving Pollinator-Friendly Garden This Winter 'Generation Restoration' Is The UN's World Environment Day 2021 Theme: How You Can Help Out At Home The Johnson Brothers Trade Day Is Back: Thursday June 17th + How To Build A Nesting Box For Our Local Possums and Birds Winter School Holidays 2021: Fun Projects You Can Do Around The Home - Something For The Young and Even Younger Winter DIY Ideas: Painting A Feature Wall + Outdoor Heating Options For Your Home + Declutter/Organise That Tool Shed Science Week 2021 Food Theme: A Salad Garden For Children Early Spring Chores For Great A Summer Outdoors: Clean and Reseal Your Wooden Deck Area Early Spring Chores For Great A Summer Outdoors: Soil Preparation For Vegetables + Salads + A Few Other Tips To Make Your Garden Ready To Plant Out Spring School Holidays Projects 2021: A Swing Chair and Dolls' House or Toy Garage The Beer Ledge: Done In An Afternoon Projects For The Garden October- November Garden Jobs: Let's Get Busy Planting Out Now + Mow For Your Bros. This Movember Mow For Your Bros. This Movember: Some Lawn Care Tips To Keep Your Grass Greener This Summer - Aerate, Worm Up!, Fertilise, Watering, Mowing Basics Christmas-New Years 2021 Checklists: Preparing The Garden & Home - Entertaining - Gift Ideas For Every Budget DIY Backyard Cricket Pitch DIY Surfboard Rack: Vertical and Horizontal Options Late Summer - Early Autumn Garden Tips: BOM Forecasts Warm Autumn 2022 With Above Average Rainfall Dealing With Dampness Inside The Home March 2022 Maintenance Of Your Home's Outside Areas After Storm Events: Paths, Walls & Windows, Dampness Under The House, Dying Lawns And Plants - The DIY Checklist Fun Project Ideas for Youngsters for Autumn School Holidays: wooden cars, blackboards, bright painted herb pots, grow your own food, make a chessboard Mother's Day 2022: Promise Her An Ever Blooming Native Flowering Plants Garden Retaining Walls Save Your Garden's Soil: DIY Winter Draught Stops To Lessen Your Power Bill Johnson Brothers Trade Day 2022: June 16 At Mona Vale + Winter Garden Jobs For A Flowering Fruitful Spring Winter School Holidays Projects For Youngsters On Rainy Days Dealing With Dampness Inside The Home: Black Mould July 2022 Stop Winter Rain Soil Erosion In Your Garden - Especially On Sloping Blocks Increases In Building Materials Costs Adds Pressure To Fixed Price Contracts - Construction Industry Father's Day 2022 - Some Gift Ideas To Make Dad Feel Special; Some For Those Without A Single Dollar + Some For Those Who Get Pocket Money! Spring 2022: Time To Get In The Garden! What Can Be Done In September - For Youngsters + Oldsters Spring School Holidays 2022: Handmade Toys - For Youngsters + Oldsters Who Want To Lend A Hand Spring Lawn Care: During Mow For Your Bro Month - Movember 2022 Preparing Your Garden and Home For Bushfires 2022 - The Rains Will Cease; Now Is A Good Time To Clean Out Your Gutters + Prep. The Home Preparing Outdoor Areas For Christmas Get-Togethers and Summer Visitors: Wooden Decks, Tiles, Pavers, Outdoor Furniture, Putting Up The Christmas Lights, Garden Spruce Up Summer Garden-House Care: when to water, mow, when and how to harvest that crop, how to keep the ants, ticks and mozzies at bay this season + Christmas Gifts for all budgets and everyone + Johnson Brothers Christmas - New Years Trading Hours End Of Summer Garden To Do List For A Bountiful Indian Summer This Autumn End Of Summer Garden To Do List For The Lawn: How To Combat Armyworm + Small Jobs Boost Winter Resilience - Aerate, Weed, Feed, Patch Bare Spots A Dry Autumn Forecast: How To Look After Your Garden During Low Rain Seasons + What Plants Thrive In Dry Conditions Autumn School Holidays 2023: DIY Project Ideas For Youngsters, Older Youngsters & The Young At Heart: Lava Lamp (60th year of this invention), Wood Building Blocks for Toddlers and Older, Let's go Fly a Kite, Basic Wood Bookshelf, Sundial, Make a rope and wood swing, Making Your Own Windchimes + more It's starting to get Cold: 11 Ways to keep your home warm, safe and save money this Autumn and Winter - what to look for in a heater; the list! Mother's Day 2023 DIY Idea: A Basic Bookshelf You Can Make For All Mum's Books Mould set to rise Inside Your home this Winter: How to Keep Air and Surfaces Healthier A Job For Life as HSC Trial Exams commence: Apprentice Carpenter + Commencement Tool List Pittwater's Noxious Weeds: A Great Time To Get Outdoors, Pull Them Out - Replace With Native Plants DIY Worm Farm: Spring 2023 Garden Prep. + Father's Day 2023 Gift Ideas DIY Father's Day 2023 Gift Ideas: Some For Little Hands + Those Now Grown + The Best Gifts For The Best Dads From JBH Dry Warm Spring Forecast: Time To Prepare Your Home For Bushfire Season - The RFS's List + 6 Easy To Do Extras You Can Do In The Garden + Home To Be Prepared, Get Ready Weekend 2023 Dry Warm Spring Forecast: Put In Drought Tolerant Native Plants + Spring School Holiday Spring Gardening Ideas For Youngsters Because They Like 'Growing Stuff' Too Johnson Brothers' Mona Vale Outlet Wins Store Of The Year Again In 2023: Tradies Breakfast Every Friday - Recycling Of Batteries Available + Spring Garden Care For Your Lawn How To Save Water This Spring-Summer How To Save Water This Spring-Summer: Retaining Water On A Sloping Site + Best Coastal Plants To Retain Soil Christmas Lights Time: Deck Your Home With Rows Of Jolly! + Pittwater MP - Leader Of Opposition Visit Mona Vale Johnson Brothers Store Christmas-New Years-Summer Prep.: Outdoor Areas For Summer Celebrations + How To Keep Your Home Cool During A Heatwave Without An Air-Conditioner + DIY Your Own BBQ Kitchen Garden For Gifts That Grow Past That Giving Day Johnson Brothers Hardware Mona Vale launches e-Waste Recycle Program Summer De-Bug: How to Keep Flies, Ants, Mozzies and Cockroaches where they belong - In the Garden Humid Summer + Above Median Rainfall Predicted For Autumn 2024 Means Mould In The Home: Some Tips To Keep The Family Safer & Healthier Go Outside & Play!: Creating Garden Spaces To Connect Children With Nature This Autumn Fun Project Ideas for Autumn School Holidays: ideas for those who like making things out of wood, growing things, painting things, storing things and one project for really big kids! Mother's Day 2024: A Few Handmade Options + Gift Ideas Mould Inside Your home after all that rain?: How to Keep Air and Surfaces Healthier Winter Draught Stops To Lessen Your Power Bill and Keep The Home Warm + JBH EOFY Catalogue Winter School Holiday Ideas 2024: Woodworking Projects For Beginners, An Artfull Garden, Vegepods For Little Hands, Easy To Make Lego Table Or Student Desk That Can Be Dismantled
______________________
John and Bob Johnson - The Johnson Brothers Profile John William Alfred Johnson - The Eulogies for those who could not attend Mass
Australia's Prime Minister Visits Mackellar - Informal Afternoon Tea with Hon. Malcolm Turnbull October 2016
JBH Win Awards August 2018 Trifecta - 2018 Free Trade Day supporters, Mitre 10 Heritage Advert features JBH Mona Vale Store, Hardware Australia’s 2018 NSW Hardware Store of the Year over 2500sqm.
Front Page Issue 294: 2018 Winners Of National Hardware Store Of The Year - Johnson Bros Mitre 10 Mona Vale !!!
National Garden Week's 2019 Focus Is On Children(Oct 13-19): School Holiday Garden Ideas (to get started on) & Congratulations Award Winning Johnson Brothers Mitre10 At Mona Vale - 2019 NSW Store Of the Year, 2019 NSW Trade Centre Of the Year and 2019 Village Garden Centre of the Year
Johnson Bros Mitre 10 were awarded as the best Trade Store in the country: February 2020
Family Hardware Store Wins Best In Australia: Johnson Bros Mitre 10 Mona Vale Crowned ‘National Trade Store Of The Year’ - Celebrating 65th Year in 2020
Anzac Day In Pittwater 2020: Candles, Crosses and Online Commemorative Services: Johnson Brothers Family Donates 20 Thousand Candles to Community Light Up The Dawn Initiative
Front Page Issue 447: ANZAC DAY 2020
Front Page Issue 478: Johnson Brothers Avalon Store Renovations & Mona Vale Store: Everything You Need This Summer In Stock
Front Page Issue 492: JBH Celebrates Upgrade Of Avalon Beach Store