August 31 - September 6, 2014: Issue 178
Classic Wooden Tool Carrier
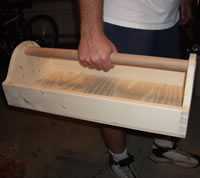 Sunday September 7th 2014 is Father’s Day, or Dad’s day – time to indulge Father Bear. If you have a dad who replies to that old question ‘what do you want for Father’s Day?’ with a ‘nothing’, an idea that may come in useful is to make something to carry his tools around in – a Classic old fashioned Wooden Tool Carrier. This can also be adapted by the dad who likes gardening to carry all those secateurs, hand forks and pliers needed to spruce up the vegetable plot.
This is one is so simple children can build it with dad, learn about how to make great carrying devices and it will last for decades.
We recommend you either treat the wood with an oil or varnish or even paint it prior to use. It is also a good idea to sand the pieces before putting them together; this will make for a smoother finish.
Although we have listed pine as the wood, you can use anything you want. Ask the friendly trained staff at Johnson Brothers Mitre 10 for their recommendations, they have some beautiful grainy timbers in stock and those that adapt better to marine work if yours is going to be mostly on your boat.
The sizings we have given are for a toolbox of a standard size but these can be adjusted to make one longer or shorter as suits.
Materials
One 19mm x 140mm wooden board, 2.4384 metres long
One (1) Piece of 25 x 89 mm Dowel, 60.960 mm long
Tape Measure
Pencil
Compass
Waterproof Woodworking Glue
Sandpaper
Finishing nails
Dowel rod
Varnish or wood stain
Sand paper
Clean cloth
Tools
Hammer
Circular saw (or plain saw)
Drill
Jig saw
Tape measure
Step One
Cut the board into three x 60.96 centimetres (2-foot sections) and two x 30.48 ( 1-foot) sections.
Step Two
Drill 3.8cm (1 ½ Inches) holes 5cm (2 inches) down from the top of the 30.48cm boards.
Step Three
Use the jig saw to cut 45-degree angle triangle from the 30.48 cm boards on either side of the drilled holes.
Step Four
Position the 60.96 cm boards with one laying flat and the other two at right angles on either side. Position the 30.48cm boards at either end of the other three boards to form a box with the drilled holes located at the top. Depending on the finish you choose, sand all the pieces before final assembly.
Step Five
Next, glue and nail the sides to the bottom and ends. Then fasten the ends to the bottom with glue and two or three nails. Nail the box together with finishing nails.
Step Six
For the dowel; trace the outline of this in the end pieces (Inside). We drilled the hole at 1/2", same diameter as the dowel itself. Insert the dowel rod into the holes of the toolbox, as a handle. This is pretty snug so you may not need glue to hold it in, but a little never goes astray if you’re building for longevity. Assembly would probably be a little bit easier if you drill the hole slightly larger and then glued it in place.
Finally, slide the dowel through the ends and glue in place, if necessary.
Step Seven
Give the toolbox once last sand with a coarse-grit sandpaper, sanding with the grain of the wood to avoid scratches. Wipe off the toolbox with a soft cloth. Continue sanding with a fine-grit sandpaper until the box is smooth. Wipe the toolbox again with the soft cloth.
Step Eight
Sand the dowel rod with a fine-grit sandpaper. Varnish or stain the rod in the desired finish. Varnish or stain the toolbox in the desired finish. Allow the toolbox to dry completely for 24 to 48 hours before using
Johnson Brothers Mitre 10 Fathers Day Catalogue out now at: www.mitre10.com.au/catalogue
A great special from there:
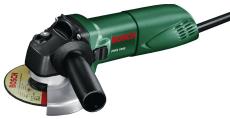
BOSCH 18V DRILL AND 670W ANGLE GRINDER COMBO
Drill: 15+1 torque settings, 10mm keyless chuck, no load speed 850rpm.
Angle grinder: 100mm disc diameter, no load speed 11000rpm.
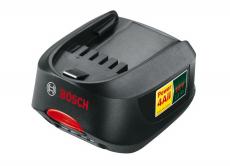
Includes 10 cutting discs and 2 x 1.3Ah batteries. $199.00


And coming up at Johnson Brothers Mitre 10's Mona Vale Store:




Products advice is available from the trained friendly staff at Mona Vale and Avalon Johnson Brothers Mitre 10.
Previous DIY Pages:
Decking Timbers Caring For Your Deck Decking Finishes Privacy Screens I Privacy Screens II Privacy Screening Hardwoods Autumn Paths and Lawns Insulation Batts Plasterboard Ventilation - Edmond's Ecofan Blackboards for Children and Home Spring Lawn Care Shade Sails & Watering Basic DIY Tools DIY Tools - Power Drills Recycle Your Trampoline into An Air Bed How to Build Your Own Backyard Cricket Pitch Christmas Lights Displays around House and Garden Summer Mildew - Refresh, Renew How to Fix Things That Drip and Bump in the Night Time To Plant Winter Vegetables – Raised Garden Beds Layout Orgainsing Your Tool Shed Make Your Own Weathervane Installing A Garden Watering System Decking Oils How To Make Garden Compost How To Winter proof Your Lawn How to create Shabby Chic effect on Timber Furniture How to Build Your Own Raised Garden Bed Growing Your Own Winter Vegetables Winter Heating Guide Prepare Your Yard For Winter Eradicating Noxious Weeds From Your Yard How to Fix Furniture Finishes Part I How to Repair Scratches, Dings, and Dents of Furniture Surfaces - Part II Winter Draughts Fix Install Your Own Skylight
Copyright JBH Mitre 10, 2013. All Rights Reserved .
