June 1 - 7, 2014: Issue 165
How to Repair Scratches, Dings, and Dents of Furniture Surfaces - Part II
In How to Fix Furniture Finishes - Part I we looked at how to fix marks that can occur on finishes - spots, white rings, bushing and marks or getting wax, lipstick and other products off prized or family loved pieces. This week we look at some of the other marks that can affect the table grandfather built or the chest of drawers hat has been part of the family for a long time and may be a bit worse for wear.
Old or new, wooden furniture often shows signs of extensive use: scratches, dings, and dents. Most of these surface damages are easy to repair, unless the problem is severe and extensive. If it is you may choose to restore the whole piece by sanding it back and re-staining. We have restored many old family pieces over the years and it's great fun as well as giving you a sense of a job well done when finished.
 You can of course refer to a previous DIY Page on How to Create Shabby Chic Furniture and give these pieces a whole new look, or, if you love the look of wood, refer to the methods used below to try and restore these to their original beauty. As always, we'd like to remind you to use safety first and ensure you are wearing an appropriate mask when using products with fumes or to protect yourself from sawdust. It is also a good idea to identify what kind of wood you are working with before you begin to know which methods will work best.
Scratches
To hide small scratches quickly, break the meat of a walnut and rub it along the scratch. The oil in the nut meat will darken the raw scratch. There are also many great furniture polishing products available today and many of these will rid surface wood of scratches.
Where many shallow scratches are present, apply hard paste wax to the surface with No. 0000 steel wool, stroking very lightly along the grain of the wood. Then buff the surface with a soft cloth. For shallow scratches on an otherwise sound shellac or lacquer finish, reamalgamation can be used to restore the finish.
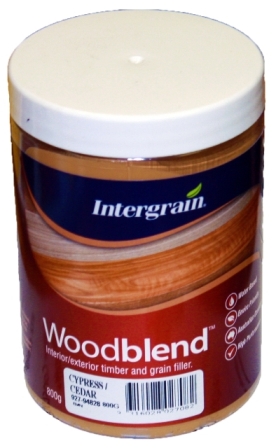
For one or two deeper scratches, furniture-patching woodblend putty is usually effective. These retouching putties are made in several wood colors, and available at Johnson Brothers Mitre 10 hardware stores. Choose a colour to match the finish. Ask in either their Mona Vale or Avalon Stores
To use the putty, run it firmly along the scratch, applying enough pressure to fill the scratch. Remove any excess with the edge of a credit card or other thin plastic card. Let the putty dry; then buff with a soft cloth.
Badly scratched surfaces should usually be re-finished, but to hide one or two very deep scratches, you may be able to stain the raw area to match. Apply oil-based stain with an artists' brush, drawing it carefully along the scratch; let it stand for 15 minutes and wipe it off. If necessary, repeat this procedure until the scratch matches the rest of the wood. Let the area dry completely, as directed by the stain manufacturer.
Gouges, Nicks, and Dings
 A gouge sometimes has a slightly raised burr around its perimeter. Level it by sanding lightly with 600-grit paper. Next, choose an Intergrain woodblend that closely matches the finish, or blend two or more together to get just the right colour. Fill the gouge until it’s slightly overfilled. Scrape off the excess product with the edge of a stiff card. Rub off any excess on the surrounding surface with a piece of a brown paper bag wrapped around a flat block. Apply a coat of clear varnish over the repair and the entire adjacent surface to impart an even sheen. Ask the friendly staff at Johnson Brothers Mitre 10 which varnish will be best for your piece.
Dings
Dings are tiny chips in the finish, usually caused by a sharp blow. The wood may not be affected. To repair a ding, use a sharp craft knife to remove any loose finish in or around the ding. Work carefully, scraping the damaged spot with the flat, sharp edge of the knife blade; do not scratch the spot. Then very carefully feather the edges of the ding with No. 0000 steel wool.
Clean the ding area with a soft cloth moistened in turpentine, and let it dry completely. Then, with an artists' brush, carefully apply new finish to the spot - varnish, shellac, lacquer, or enamel - to match the rest of the finish. The spot will be very noticeable at first. Let the finish dry; it will be glossy. Then lightly buff the spot with No. 0000 steel wool, and polish the entire piece of furniture. The ding should blend perfectly when the job is complete.
Dents
Small, shallow dents in pine and other soft woods are usually easy to remove; large and deep dents, especially in hard wood, are harder to repair. Dents are easiest to remove from bare wood. Very large, shallow dents are probably best left untreated. Very deep dents should be filled, as detailed below for cracks and gouges.
On finished surfaces, you'll have to remove the finish around the damaged area. Using fine-grit sandpaper, carefully remove the finish for about 1/2 inch around the spot. To raise the wood in the dent, apply a few drops of water to the dent and let the water penetrate the wood for a day or so. Do not wet the entire surface. This treatment may be enough to raise the dent, especially if the dent is shallow and the wood is soft.
If this doesn't raise the dent, soak a cloth in water and wring it out. Place the damp cloth, folded in several layers, over the dent; then press the cloth firmly with a warm iron. Be careful not to touch the iron directly to the wood. This moist heat may be enough to swell the wood and raise the dent. If it isn't, apply a commercial wood-swelling liquid to the area and give it time to work - about a day or so, as directed by the manufacturer.
For deep dents that can't be raised with water, heat, or wood sweller, use a fine straight pin or needle to drive a series of holes in the dent. Pound the straight pin in about 1/2cm, and carefully pull it out with pliers; the holes should be as small as possible. Then treat the dent as you would for a shallow dent. The pinholes let the water penetrate the wood's surface. If you're careful, the holes won't show when the wood has been raised.
 After the dent has been raised, let the wood dry for about a week, and then refinish the damaged area as above. Let the finish dry completely. Lightly buff the new finish with No. 0000 steel wool, and then polish the entire surface.
Fast Fix for Blistered Veneer
A simple repair for a blemished surface: The top on many tables, dressers, desks, and other furniture is made of a thin wood veneer glued to a solid-wood or processed-wood substrate. Over time, the glue bond often fails and the veneer blisters — especially when subjected to heat and moisture (such as a cup of hot tea or coffee). To repair a veneer blister, carefully slit it open with a razor knife. Then use a glue syringe or a toothpick to apply yellow carpenter's glue beneath the veneer. Press down lightly on the blister to spread the glue. Cover the repair with wax paper and a flat wood block, then clamp the blister flat. Let the glue cure overnight. Then remove the clamp and wax paper, and lightly sand and refinish the surface. Prevent new blisters by applying two coats of varnish or hand-rubbed wood oil on the veneer — and keeping anything hot or wet off the surface.
Johnson Brothers Mitre10 - Trade Day 2014
Annual Trade Day with an afternoon of never to be repeated prices, giveaways and more.
Thursday, June 26 at 12:00pm - 6:00pm: 51 Bassett Street Mona Vale, NSW, Australia
Products advice is available from the trained friendly staff at Mona Vale and Avalon Johnson Brothers Mitre 10.
Previous DIY Pages:
Decking Timbers Caring For Your Deck Decking Finishes Privacy Screens I Privacy Screens II Privacy Screening Hardwoods Autumn Paths and Lawns Insulation Batts Plasterboard Ventilation - Edmond's Ecofan Blackboards for Children and Home Spring Lawn Care Shade Sails & Watering Basic DIY Tools DIY Tools - Power Drills Recycle Your Trampoline into An Air Bed How to Build Your Own Backyard Cricket Pitch Christmas Lights Displays around House and Garden Summer Mildew - Refresh, Renew How to Fix Things That Drip and Bump in the Night Time To Plant Winter Vegetables – Raised Garden Beds Layout Orgainsing Your Tool Shed Make Your Own Weathervane Installing A Garden Watering System Decking Oils How To Make Garden Compost How To Winter proof Your Lawn How to create Shabby Chic effect on Timber Furniture How to Build Your Own Raised Garden Bed Growing Your Own Winter Vegetables Winter Heating Guide Prepare Your Yard For Winter Eradicating Noxious Weeds From Your Yard How to Fix Furniture Finishes Part I How to Repair Scratches, Dings, and Dents of Furniture Surfaces - Part II
Copyright JBH Mitre 10, 2013. All Rights Reserved .
